Importing Student Data
Importing Student Data
Importing student data from another source or location, can be very helpful when setting up student accounts. If you have student data in another program or spreadsheet (Names, Addresses, etc.) simply importing it into SL will give you a good starting place to build student accounts - without having to re-key everything into the system. School Lunch can import tab delimited text files. Before importing any information, be sure to make a complete backup of all your files.
Our Import Wizard makeover is significant upgrade. It has never been easier to import student information into School Lunch. School Lunch allows you to import any tab delimited text file (quote marks omitted). School Lunch will not import the very first, or 'header' record. However, including a header record will make importing a little easier.
Creating an export template that matched our import fields will make this task much easier from year to year. Not all the fields need to be imported but a few are required and a few more make things much easier with less work to do down the road.
REQUIRE FIELDS: ID, LAST, FIRST, CLASS, STATUS, TRACK (Fields you may not have are STATUS AND TRACK, these may need to be entered later.)
SUGGESTED ADDITIONAL FIELDS: PHONE, EMAIL, and less important might be ADDRESS, CITY, STATE and ZIP.
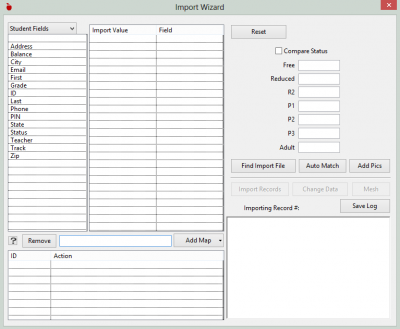
To begin, select FILE—>Import Records from the Command Center window. The following window will appear:

- On the left side of the window is bank of all the possible import fields that School Lunch will accept. Select FIND IMPORT FILE. The very first row of your import file should appear under 'Import Value.' Now we will assign a School Lunch field, to each field you wish to import.
- Use a single click to highlight an 'Import Value' field. Then, find the School Lunch equivalent from the field bank on the left side of the window, and double click. Follow these same steps for each field you wish to import.
Note: You don't have to assign every field from your import file, if there for example, fields that School Lunch does not accept (for example, a birthday field). Don't assign it any field from the School Lunch field bank, and it will not be imported.
If you make a mistake, and assign the wrong field to a value, simply click RESET and try again.
 Compare Status: School Lunch uses a specific status assignment to function properly. If your import file does not have the proper status assigned to each record, you can use the compare status option. Click the COMPARE STATUS button and enter the status as found in your import file in the associated fields under the COMPARE STATUS button. These names will be compared with your import data and assigned the proper status during the import process. If they are not spelled exactly the same a comparison will not be made and the records will be assigned a “P1” status.
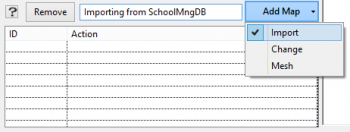
 School Lunch gives you the ability to create 'Import Maps'. An import map remembers how you imported your last batch of information. After assigning your values a proper School Lunch field, simply type in a Map name that you can recall next time to need to import this particular field sequence again. Click on the ADD MAP menu, and select the circumstance for which you would like School Lunch to save this map for. Next time you import information in this same manner, find you file to import, select the map you created from the list box below, and double click. Glance through the import values and assigned fields, to make sure they match up. Then click IMPORT RECORDS. Maps can also be built and used for CHANGE DATA and MESH which we will go over next. You can always delete an import map by clicking the REMOVE button.
Change Data: The CHANGE DATA button gives you the ability to change data for records that already exist. For example, if you have a group of students that have moved and now have a new address, you can change their addresses in just a few steps:
- Click FIND IMPORT FILE and locate your file.
- Match up the Import Values with the School Lunch Fields you wish to change. In this case, it would be ID, Address, City, State, and Zip. Note: Don't match up any import values with fields that you do not want to change. Click CHANGE DATA. The account manager should now have the most current information. Check the Account Manager, to make certain. This is also a great way to add emails or phone numbers that might be collected throughout the year.
Mesh Data: The MESH button is similar to IMPORT RECORDS with one exception. MESH will attempt to import the records from the list. It it finds an ID that already exists, MESH will ignore that record for import and quickly move on to the next. IMPORT RECORDS on the other hand , will ask you about each identical ID encountered and see if you want to replace it with the new record or leave the original. MESH will only import the new unique ID instances on your import list. MESH is just a way to quickly import newer data to an existing SL data file ignoring any records that might already exist. To change any data you must use the CHANGE DATA option.
- Click FIND IMPORT FILE and locate your file.
Note: For CHANGE DATA to work properly, the ID fields on your import file MUST identically match the ID for the record you are wanting to change. Always do a backup before attempting.
Auto Match: If your text file column headers, match the Import Wizard's values, simply click AUTO MATCH and School Lunch will do the work for you, matching an import value where the field exists. For AUTO MATCH to work, your import file header must exactly match the field name that School Lunch uses.
Once the import process is complete, go back to the Account Manager and check to see if things were imported correctly.
You can SAVE LOG, in case you ever need to look back and see what function was performed to what records.
Importing Family Data
If you have family data organized and manageable, there is a work-around way to import this data. We recommend contacting us to help you with this step, as it is not executed in the same manner as importing student data.
Family data will need to be provided as a tab-delimited text file. The following fields are available for import into School Lunch:
- FamilyID
- First
- Last
- Address
- City
- State
- Zip
- Phone
- Email
- Students
- FamilyPIN
- Note
- Family_Amt (do not include '$' symbols)
- Dep_Total
Include a header line, typed exactly as shown above, for all the fields you wish to import. Delete extra fields, and/or fields that are not necessary, such as birthday or gender. You do not need to assign fields that you do not have data for.
Directly below is an example of clean family data with a header record before saving as a tab delimited text file. Header record can always be added to the actual text file in a text edit program, it data is exported from a database without a header.

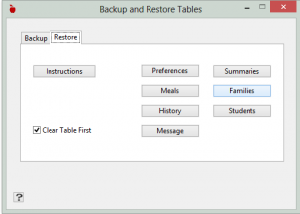
From the Command Center, click on the UTILITIES menu, and select 'Backup and Restore Tables.'
A new window will appear. Towards the top left, toggle to the RESTORE window and select FAMILIES.
 Use the search window to find your text file and click OPEN to 'restore,' therefore generating your family data.
Now that the family data is in the system, you will need to add all students to their respective family. Linking Students to Families
Importing Photos
School Lunch can store & display student pictures. Pictures are linked to the individual student accounts. The student's picture will appear in the account manager, and in the lunch line.
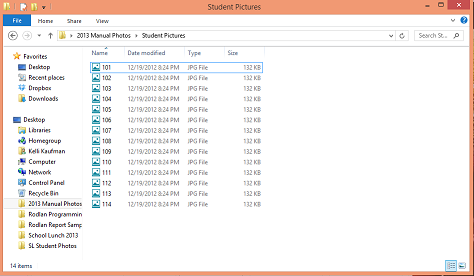
School Lunch can import photos in mass quantities. This can be accomplished if the photos are pre-sized and named to correspond to the student ID using the .jpg extension (ie: 496.jpg). Many school photographers are able to provide schools a CD with all the photos renamed and sized for direct import in to the program. To be compatible with School Lunch, photos are best sized to fit 75 pixels wide by 85 pixels tall in the jpg format. This is a small size that will take minimum room in the data file and keep display times to a minimum during lunch card scanning.
 When importing photos always make a backup of your data first. All the photos that are going to be imported should be in a common folder with no other items present. Open the import window by selecting IMPORT RECORDS from the FILE menu. In the upper right section of the window is an ADD PICS button. Selecting this button will take you to a navigation window that will be used to find the folder where the photos reside. Choose the folder and the import process will begin. If there is a photo in the folder to match a record id in the program, the photo will be imported. The log on the import window will keep you up-to-date of what happened during the import process.
If you have student photos, but they don't necessarily fit the above size specifications, you can still import them into School Lunch. Check out Photo Size & Send.