List Wizard
The List Wizard lets you build select student and family lists. You can choose different groups of students (i.e. students with delinquent accounts, students from a certain class, etc.) and preform certain actions (print reports, send emails, generate lunch card barcodes, etc.) with the group you have selected. Watch the short List Wizard demo video for a quick look at the List Wizard.
The List Wizard is easy to use. From the Command Center, click on the LIST WIZARD button. On the left of the screen, is where you will search for accounts meeting your specific criteria. We will refer to it as the SEARCH SECTION. Records found will be displayed in the large list box above. This is where the specific searched records are pooled and edited for a specific action. The buttons on the bottom right side of the List Wizard, are used to print Reports & Lists, and perform List Actions. We will refer to it as the ACTION SECTION.
Searching
The SEARCH SECTION consists of several options for preforming searches. Search for different groups of students by clicking SELECT STUDENT SEARCH. The arrow on the button indicates that this button is drop-down menu, with several popular student search options to choose from. 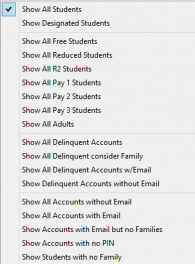
The SELECT FAMILY SEARCH button works in the same way, but is only used when family accounts are available. You can also use the SELECT CLASS button to display all the students in a class, or the SELECT GRADE button to display all students in a specific grade. There is also a CUSTOM SEARCH button, for complex searches.
CUSTOM SEARCH:The CUSTOM SEARCH button is used for complex searches. It allows you to pick which criteria you would like to search and allows you to select between options such as last name, ID number, teacher, status, track, balance, and last transaction date to name a few. In the second POPUP MENU you have a choice between equal, less than, or greater than, not equal to, greater than and equal to, and less than and equal to. In the edit field, put the criteria that will make your search equation complete. For example, if you wanted to pull up a handful of new students that need ID cards, you can SEARCH by ID, then MOVE FOUND. Do this for each new student.
After clicking MOVE FOUND, the record will be displayed in the scrolling list box above the search center after pressing the SEARCH button. The AND button allows you to search by a second variable, if ever needed. Scroll through the list and see if the information is as you expected it to be. You can always start over by clicking CLEAR LIST. To help make the data more meaningful, click the header you want to sort by and the list will sort on that column.
Once the records have been moved to the main screen, you can do a new search or move on to performing an ACTION to your list. More than one search can be added to the main screen before printing. This allows you to preform complicated searches by searching for one component at a time.
Show Designated Students: This option will pull up all students that do not belong to a family, along with one 'designated' student that is a part of a family. This way, you can send one delinquent account email or note home, for the entire family. When you select this option in the List Wizard, individual students (not belonging to families) will be listed first. Towards the bottom of the list, you'll see the designated family student.
Assigning the DESIGNATED STUDENT happens in the Family Manager's SIBLING BOX. Simply highlight the student you'd like to assign as the family's designated student, and drag them to the top of the sibling list:
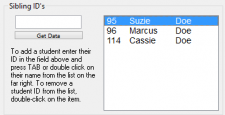 In the example above, we have moved Suzie to the top of the sibling list, by highlighting her name with a single mouse click, and dragging her name to the top of the list. She is now the designated student for the Doe family.
Barcodes and Labels
The List Wizard is where you print barcodes and labels. Searches for barcodes and labels are performed
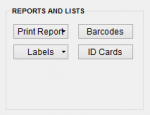
just like in our example above. Then we choose an REPORTS & LISTS option from the right side of the screen:
Barcodes: Barcodes are printed on a 3 across, 10 down, standard 30 to a page laser printer type 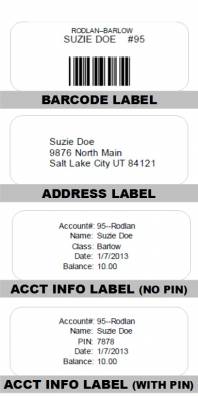 label. Barcodes are printed using graphics and do not require a special printer font. School Lunch is only
programmed to print numeric barcodes using the 3 of 9 standard. Be sure to only use numbers in your
student ID numbers.
Practice with plain paper in your printer and check to see if the barcodes are printing in the proper place.
Hold a blank page of labels in front of a printed barcode sheet and raise it to the light. You should be
able to see if the alignment is correct. When printing any of the label options, a printer setup dialog box appears before the print dialog box. Depending on the operating system, printer driver, and printer, you will have the option to choose paper size and orientation. Make sure you are printing in portrait mode using the largest print area on a letter size sheet. This will give more printable area and will accommodate longer barcodes better.
Address Labels: Address labels are printed on the same labels as barcodes — 30 to a page. Labels are printed with the standard address information from the account manager. If you are preforming a search by student, you will produce a label for every student in your selection, regardless of if they have another sibling at that same address. To print family labels (one per family) you'll want to do you search with the SELECT FAMILY SEARCH criteria. And of course, you'll need to have family accounts set up. The address used on family labels will be the address provided in the Family Manager.
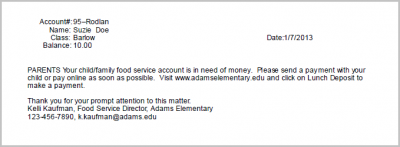
Account Info Labels: Account information labels are printed on the same labels as barcodes — 30 to a page. The information on the label includes account ID# and school name, student name, teacher name, current date and balance. Traditionally account info labels were used to place on a blank envelope and send home with students who have a negative balance in their account. You may want to perform a search for all students that have a balance below -$1.00. This will eliminate all the free students that have a zero balance. When searching for balance amounts, do not use the dollar sign ($) in your search criteria. From the main List Wizard screen, sort by class by clicking on the teacher column header and print the labels. Once printed, cut the labels apart by class and give them to the teachers to distribute for students to take home. These info labels can be printed with or without WAV (Web Account Viewer) pins.
Printing ID Cards
You can print ID cards with or without student photos. Using the List Wizard, pull up a list of the students who’s ID cards you wish to print. From the REPORTS AND LISTS box, click on ID Cards. The Card Viewer window appears. Scroll through the cards using the scroll arrows in the upper left corner:
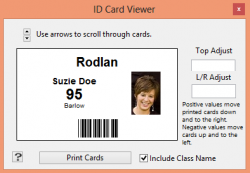 Photos will appear on accounts with photos, and the card information will be centered on accounts without photos. ID Cards are designed to be printed on pre-perforated business card stock available from stationary stores. The Avery brand is readily available at office supply stores. Cards are 3.5 inches by 2 inches. Try printing on plain paper to see if adjustments are needed before printing on expensive stocks. Using plain paper is also an option. Cards can easily be cut out on a paper cutter and laminated. If this seems like too much work, give us a call. We have a card printing and laminating service available.
Standard Option Lists
Standard option lists are lists that have a preset template built for them in the system. They are designed to optimize paper by putting more than one column of information per page. In these lists you are not given the chance to delete a column of information. They pull in the information needed to produce the standard lists.
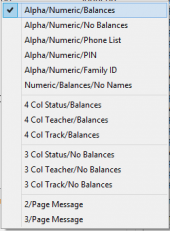
You'll start by preforming the routine LIST WIZARD Search. Once you have the select group of students in the List Box, for which you'd like to work with, simply select the report type you would like to create. Under REPORTS & LISTS, click on PRINT REPORTS. The following drop-down menu will appear:
Alphabetical Lists
Alpha indicates that the list will contain student names. The options following the / or backslash, indicate the other information which that particular preset list contains. Numeric indicates that list will print with account ID numbers.
For example, the Alpha/Numeric/Balances is list that contains student names, ID numbers & account balances.
Don’t forget to sort the information in the list box. either numerically or alphabetically by clicking on the column header. Try out these different preset templates to see which will work best for your needs.
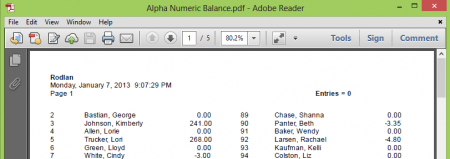
The example above is a snippet of a Alpha/Numeric/Balances report. As you can see, it contains Account ID's, Names, and Balances for our selected students.
Status, Teacher, and Track Lists
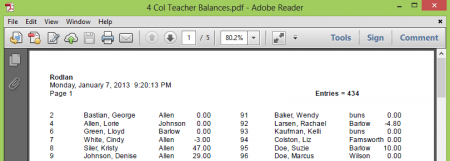
Status, teacher, and track lists can be produced either with or without balances. These options are printed with the account ID and student name. if you chose to print with account balances, this will add an additional column to your report making is a 4 column report. For example, the 4 Col Teacher/Balances will generate a report that shows Account ID's, Student Names, Teachers, and Balances:
Master Family List
The Master Family List option, provides a list of all family accounts and shows the individuals associated with each family, along with ID numbers.
Try out these different preset templates to see which will work best for your needs. Don’t forget to sort the information in the list box. either numerically or alphabetically by clicking on the column header.
Email Wizard
The Email Wizard allows users to create emails much like mail merge. Check out the Email Wizard Demo Video for a quick and easy overview.
There are multiple things that must be working correctly on the schools end to work smoothly. We will attempt to explain the issues, but ultimately it is the schools responsibility to work with your system administrator to get all the email issues resolved.
For emails to work properly the school information must be entered correctly in the preferences section of School Lunch. This information is available from your system administrator and includes your username, password, whether your email connection uses SSL or not, the correct port and outgoing mail server SMTP account. Find out hot many messages your outgoing mail provider will allow you to mail out at a time. Some mail servers have quantity restrictions, to control users from sending spam. You may have to contact your email provider for more information on this. We have been very successful with Gmail but there are a few things to know in the setup. Refer to preferences for these details.
How it works:
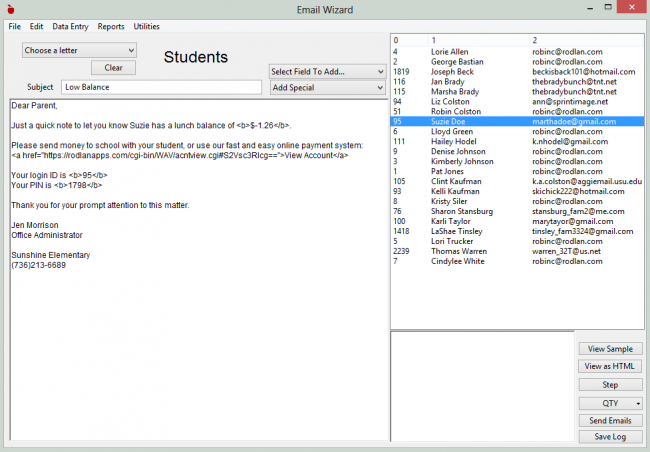
- Perform a List Wizard search to select the student(s) or family(ies) from which you would like to send an email. List Wizard will pull in the email addresses associated with your List Wizard search. Scroll down through your email list to make sure all records are as expected. If you notice a record that don't want to send the email to, hold down the shift key, and double-click. By making a single click on an individuals address, you can edit the address if needed. Note: If you edit an email address here, the edit will only hold true for this one instance. To make a permanent change to an email address, you must make the change in the account manager. (Changing the email addresses in this manner allows you to do test by substituting your email address or by using the email address of others you may want to have proof your work.)
- Start creating your email template. The 'Subject' you enter will be the subject of the email to the parent, and the name of the letter template. To the right of the email 'Subject' field, is a drop-down list of all possible variable fields available for your email template. The drop-down list will vary slightly, based on the type of search preformed (student or family). Play with the SPECIAL drop down menu, to add italics or bold certain parts of the email if desired. After you create your letter template, click save.
- Use the drop-down menu at the very top of the window, to select the letter just created. Highlight a student name from your list of emails on the right side of the Letter Wizard screen. Click 'view sample' to see what the letter will look like for that student. Use the 'step' button to step down through the students and view the letter with each students individual information. View how the email will look to the parent, buy clicking VIEW AS HTML.
- If you need to modify a letter, choose the letter from the letter list and make your changes. Upon saving, changes will over-write the current letter. You can create as many letter templates as you wish! The possibilities are endless.
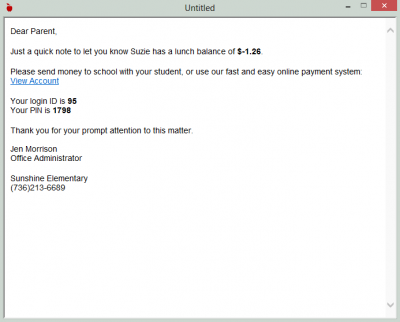
The screenshot above shows the raw text of Suzie Doe's customized email, after clicking 'View Sample'. The screenshot below shows how that same text will be displayed to the parent as an html email.
Ready to Send
Once you have things to your liking, press the Send Email button to begin the process. Emails will be sent one at a time from the list. If a problem is encountered sending will pause. Look over the email address at the top of the list to see if you can see a reason for the mail not sending. Email addresses can be temporarily fixed in the list but permanent changes must be made in the Account manager. If you are unable to correct the email address at that time you may remove it from the list by holding down the shift and double-clicking. Press Send Emails to begin the process once again.
Certain email services will only allow a few emails to be sent at a time (eg. less than 10) so you may have to play around with the QTY button when sending emails. The QTY button allows you to select a predetermined number to attempt before pausing. With our new email routines we have seen less of a need for the QTY button.
You can also access the Email Wizard straight from the Account Manager and Family Manager, for a quick single-instance letter or email.
Helpful Suggestions for Emailing
- It is a good idea to set up a test situation for learning how to work the email component. This will allow you to do testing and see that it is working the way you intend it to work. Parents will not appreciate being a part of a test program, receiving a lot of non-meaningful emails. Set up a test List Wizard search with teachers and staff emails so they can provide feedback on the success and troubles you may be having. Emails have worked properly in several schools, but it is up to the school to see that things are set up properly. If an email in the list has serious issues, the program will produce an error message and emailing will stop. Every effort should be made to enter emails correctly. Incorrect emails will probably come back to the reply email address as being rejected. These rejected emails will help you find the troubles in your database.
- Another idea to help you refine this process is to do your searches class at a time and only send one class at a time. This will allow you to work with smaller groups helping you to find troubles sooner.
- Before sending to a group, make sure you pull up a freshly saved letter template. The email must be clean with the substitution markers and no actual names or filled in fields.
- Once a letter is saved it will need to be pulled up again to begin the merge process.
- If you want to create a link to another location other than the WAV, use our generic link option and fill in your own information. Test the link with an email to yourself.
Attachments
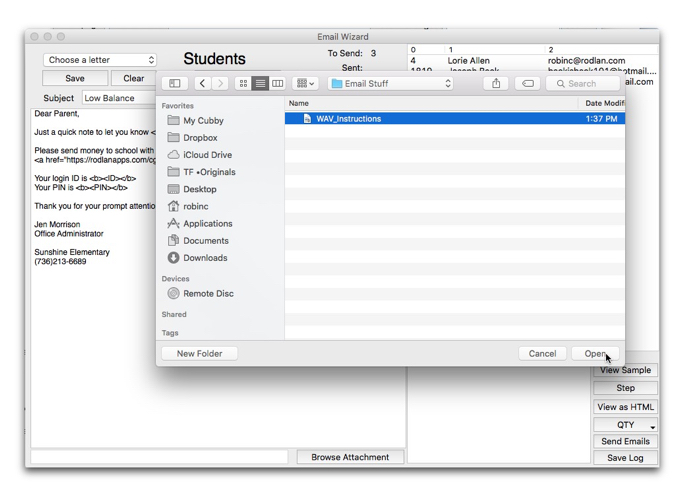
Beginning in 2016-2017 you can send attachments with emails. Begin by clicking the BROWSE ATTACHMENT button at the bottom of the Email Wizard window.
An open dialog window will appear. Navigate to the location of your attachment and complete the process by clicking on the attachment in the open dialog window and pressing the OPEN button. The name of the attachment will appear in the field to the left of the BROWSE ATTACHMENT button.
Letter Wizard
The new and improved Letter Wizard for 2014! (Previous SL versions, see Messages For Home option below this section)
The Letter Wizard works much like the Email Wizard. See How it works, steps 1-4. Wizard emails and letters share a virtual folder, so to help keep them straight, we would recommend adding :Letter or some other obvious header to the subject line of the letter, so you can easily recognize the letter templates from the email templates. i.e. Delinquent Account :Letter All letter-merge fields are available, much like the email-merge. Letters, however, do not use the same HTML traits (such as bold and italics.) If your school uses the Letter Wizard, we would appreciate hearing from you to determine if adding more features to future versions would be worth while.
You can also access the Email Wizard straight from the Account Manager and Family Manager, for a quick single-instance letter or email.
Messages For Home: Using the LIST WIZARD, you can send home a message based on any chosen criteria. The message prints the same default information found on the info labels. It also prints a message that you design in the preferences section of School Lunch under the MESSAGE tab. Messages are designed to print three to a page. Perforated laser printer paper is available in the three to a page format. This can be purchased from local paper suppliers, or can be cut from standard paper. Before trying this option for the entire school, make sure you do a small test with about 10 students to make sure things are working as you are expecting.
Meal Stats
With the Meal Stats list action, you can look at transaction numbers, transaction totals, number of deposits made, and deposits total, etc. for groups of students. First, run your List Wizard search for the group you'd like to view. Then, click the MEAL STATS button under List Actions. A new window will appear. Select the month and year you would like to view stats for, then click BEGIN REPORT. A list will be generated and displayed. You can use the column headers to sort the list. You can also export the data if you wish.
Changing Classes/Tracks/Pay Status
At the end of the year you may change classes for each student to prepare for the next year. This is done very easily without having to change each student account to complete the process. Using the LIST WIZARD, you can pull up students any way you like. This process could be easily done by class or by school and sorted alphabetically. Preform your search and then select SPECIAL from the bottom of the popup list of ACTIONS. The hard part is getting all the kids you wish to assign to a new class in the list box for re-assignment. You will need to be creative on this issue. You can work will small groups at a time. Once you build your list the way you want it, press the CHANGE ALL button in the bottom right corner of the screen. Pressing the CHANGE ALL button will change all the teachers in the accounts showing in the list box to the teacher you selected from the CLASS LIST in LIST ACTIONS. For larger schools this may not be an option. Classes might need to be changed one at a time. This same process works the same for changing tracks, and pay status.
Visit our Products page for current lunch card pricing.
Generate Random PINS
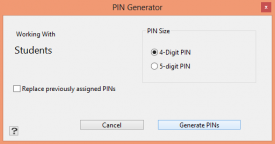
If your school is using WAV (Web Account Viewer), your parents will sign in using their student's ID number and a PIN number. The easiest way to assign a PIN number to each account is to generate them straight from School Lunch. To do this, create your criteria list from the SEARCH options on the left of the List Wizard. When the list box contains all the students for which you would like to generate a PIN, click on SPECIAL from LIST ACTIONS and select GENERATE RANDOM PINS. A PIN Generator box will appear:
You can choose whether your school would like to use 4-digit or 5-digit PINS. Be consistent. If you have the Replace Previously Assigned PINS box checked, you will override existing PINS with a new, random PIN. Use this check box with caution.
Once you've assigned PINS, you'll need to let the parents know what their ID and PIN is. An easy way to do this would be to send out an email to parents with this information. Create your email message in the Email Wizard, using the handy mail-merge features, and include ID and PIN fields. Refer to the Email Wizard section to learn how to use Email Wizard.
If a parent should wish to have their PIN changed, you can go into the Account Manager (or Family Manager if the school uses Families) and manually change the PIN for the parent.
Exporting Data
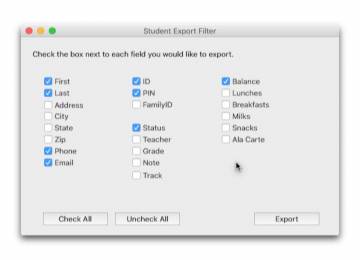
To export any data from student or family records you must first pull up the desired list to export in the List Wizard. Once your selection is showing in List Wizard, click on the Export pull down button in the list actions section. From the list you will be able to choose one of the export options. All saved files are in a tab delimited text file which can be imported into Excel or another spread sheet.
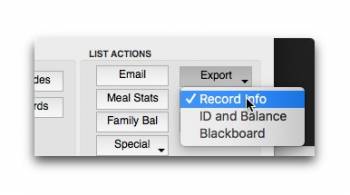
Record Info
Selecting this option will open the Export Wizard window.
You will be shown student fields or the family fields based on your search in the List Wizard. Choose the fields you want to export by placing a check by that item. Once you have all the fields selected, press the Export button and save the file. This will be saved with a .csv extension which usually opens directly in to Excel by double clicking on the file. If not, open the spread sheet program of your choice and either open or import the file based on the instructions of the spread sheet you are using.
ID and Balance
This exports ID and Balance in a TAB delimited text file.
Blackboard
This option was designed to export a file with information for using with Blackboard, a system that many schools use for calling, emailing or texting parents. This is used for account balance information only.
Delete Records
Under the LIST ACTION's 'SPECIAL' menu,there is an option to delete records. This can be a quick and easy way to remove your graduating class from SCHOOL LUNCH. Always make a backup before attempting this action. Families cannot be deleted here. Families must be deleted in the Family Manager.
