Lunchroom Transactions
THE PROCEDURES FOR BREAKFAST, LUNCH, OR SNACK FUNCTION THE SAME.
Getting Started
Choose the transaction type from the DATA ENTRY menu or the Control Center. The following window will appear:
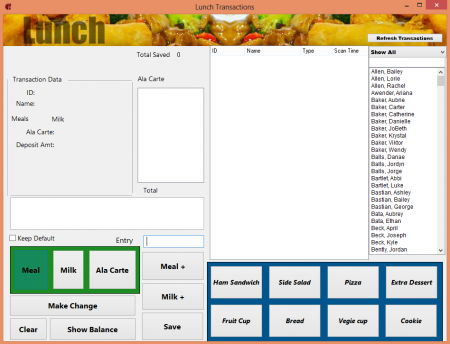
On the left outlined in green you will see the three transaction types, regular MEAL, MILK, and Á LA CARTE, and a check box labeled KEEP DEFAULT. The original default is MEAL.
In the lunchroom you will be able to select a temporary default by pressing the transaction button bordered in green. In the image below, we’ve selected a temporary default for an Á LA CARTE entry:
 This default will only last for one transaction and the button will return to the original MEAL default as soon as the transaction ends. If you want to change the default for more than one transaction, click the KEEP DEFAULT check box. By clicking the check box, you can keep your temporary default as long as you want. The default will then remain the same as long as you are in the LUNCH window and leave the box checked. When you are ready to go back to MEAL original default, click the check box again and
select MEAL. The button will go back to the MEAL default.
New to 2013:
There is now an option in preferences to make MEAL not the lunchroom default. It basically highlights the ALA CARTE button.
 With this box clicked in the the preferences, you will scan a card or enter a number and it will not add any default action. From there you can click the meal button, milk button or any ala carte item(s). Entering the next number will move the transaction along.
Screen Information & Messages
You can set your preferences to always show the account balances as students walk through the line. If you do not want to show balances as students pass through the line (privacy protection) but a student should inquire about his/her balance, you can simply click on the SHOW BALANCE button while that student is showing the Transaction box. Similarly, if you chose SHOW STATUS CODE in the preferences window, the code of the student in the information box will appear directly below the 'Total Saved' figure.
The TRANSACTION DATA box of the LUNCH window shows the information that you will be entering at lunch time. It also displays warning messages about certain accounts. If a warning message appears, it will be accompanied by a series of beeps. Listed below are possible messages that you will see in the information window:
1 beep: BELOW FLAG. This message will appear in red. It tells you that the student is below the flag level that you chose in the MEAL RATES section (Chapter 1). You can remind the student that he needs to deposit money in his account.
2 beeps: ZERO BALANCE OR LESS. This message will appear in red. If the account is at zero, this will be the only message. If the account is less than zero, an account balance will also show if you checked DISPLAY NEGATIVE BALANCE in the PREFERENCES section.
3 beeps: CARD REJECTED! Blocked for…This indicates that the card is being used for a blocked transaction. The card will not be accepted. If a student has been blocked from certain transactions in error, you can change it in the CHANGE ACCOUNT window.
4 beeps: ACCOUNT HAS BEEN USED MORE THAN ONCE! This message alerts you that the account has already been used during this session. This may be intentional and the transaction will not be blocked, but the message alerts you to the situation. The message will not appear for a card that is used to purchase several meals at the same time. For example, if you have an account for Adult Guests, you can enter that account number several times to purchase meals for all the guests and the message won't appear. But if you enter the guest account number once then enter other account numbers, the message will appear the next time you enter the guest account number.
4 beeps: NUMBER OUT OF RANGE! The account number doesn't exist. The program will not accept any transactions for this number. As you might have guessed, you will be hearing a lot of beeps. If a student account is low and the card has been used more than once, you will hear a series of beeps.
Always look at the screen to see all the messages that appear. This will be the only way to know for sure what information you need to relay to the student. Messages will appear in red, in the Transaction Data box.
The TOTAL SAVED number of entries appear in the upper left corner shows how many transactions have been entered since the last report was printed/posted. When a report is processed, this number will return to 0. The maximum size for a single report is 2000. Since every meal should have its own report, this number should never get much above your average school attendance.
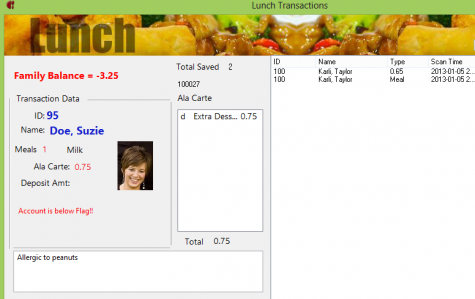
The screenshot above shows us several things:
- We have selected in our preferences to show balances during transactions. In this example, you can see that Suzie has a balance of -$3.25.
- We have received a warning message that Suzie's account is below the Meal Flag number we set in our preferences. We can also see that she is allergic to peanuts.
- She is purchasing a meal, and an ala carte item (extra dessert.) The '100027' on the screen, is an arbitrary number we have selected to indicate Suzie's pay status.
- And finally, we have a 'TOTAL SAVED 2' which indicates that there are 2 records that have been saved to the PROCESSED box, indicating that Suzie's transaction has not been saved at this point.
Processing Students
When you open the LUNCH window from the DATA ENTRY menu or the Command Center, the cursor will be in the ENTRY edit field. Start processing students by entering student account numbers in this field. You can do this by typing them from the keyboard and pressing RETURN or scanning the barcodes from the student lunch cards. There is no need to press RETURN when using the barcode scanner. When using the barcode scanner, be careful not to scan the barcode more than once. This will result in the account being charged more than once for a meal.
The student's basic information will appear in the TRANSACTION DATA box above. The type of meal activity that is taking place and any warning messages will also appear in this location. You now have several options. You can add a meal, add a milk, add á la carte items, take money from the student and either keep the change as a deposit or make change, show the student’s balance, save the information or delete it.
Purchasing Extra Items
Extra Meal: To purchase an extra meal simply click the MEAL+ button while their information is in the Transaction Data box.
Extra Milk: If students want to purchase extra milk, enter their number through the regular meal process first, then click the MILK+ radio button or scan the +MILK barcode on the barcode menu.
Á La Carte: To purchase an á la carte item only, click the Á LA CARTE button or scan the Á LA CARTE barcode. Enter the student account number in the ACCOUNT # edit field. Click one of the eight Ala Carte buttons, for which the student would like to purchase.
To purchase one of the other 18 Ala Carte items that can be entered into the School Lunch, you will simply use the corresponding letter of the alphabet from the á la carte item that you entered in the MEAL RATES preference. Enter the corresponding letter of the alphabet in the ENTRY text field. Press RETURN after each letter entered.
If you have a scanner and an á la carte barcode menu, simply scan each item on the list that the student wishes to purchase. As you enter an item, it will appear in the á la carte box with a running total at the bottom of the box.
Simply swipe the next individuals lunch card (or enter the students account number) and the previous student's purchase will be flushed to the PROCESSED box. The PROCESSED box will show the transaction information of the students that just took place. The name and account number can appear on the list more than once. For example, once the transaction for a lunch and an ala carte item is flushed to the PROCESSED list, it will appear once for a regular meal and once for á la carte. This makes it easy to delete any portion of the activity if needs be.

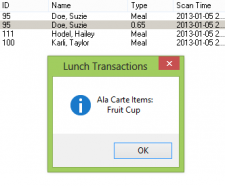
The example above shows two entries in the PROCESSED box for Suzie Doe. One is for a meal entry, the other is for a $.65 al a carte item. Double-click any saved á la carte transaction in the PROCESSED list, and you will see a list of the á la carte items associated with the transaction:
Accidental Entries
Any transaction can be deleted from the Meal window before printing the meal report. From this window, (in this case, its the lunch widow) we can delete activity that has been entered by holding down the shift key and double clicking on the transaction in the PROCESSED list.
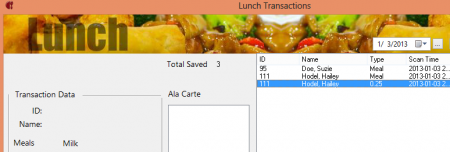 In the example above, we want to delete our accidental entry for Hailey's $.25 Ala Carte item. So we'll simply highlight the transaction, hold down the shift key, and double-click.
Posting Reports
Once transactions have been saved, a report can be printed and corresponding report options will self activate under the REPORTS menu or in the COMMAND CENTER. If there is no report information to print, the MEAL REPORTS options, as well as the TRIAL options, will be deactivated and show in gray under the REPORTS menu. It is important to print a lunch report after every lunch. The information will not be posted to the student accounts until the report is printed. If a lunch report isn't printed, it will show up on the next report as if entered at that time. Not printing the reports causes too much information to accumulate in the various files which could cause problems later on.
Make Change
Some schools allow students or visitors to pay for meals in the lunch line. Using the MAKE CHANGE option gives you more flexibility in how you choose to process your lunch line. It will slow the line down if you use it frequently, but it can come in handy at times. You should decide when and how often you plan to use it so that it doesn’t cause problems.
When you set your preferences, you were given the option of choosing GIVE CHANGE. Clicking the GIVE CHANGE option sets the default to automatically calculate the change from any money a student gives you. The program will only take the amount needed for the current transaction regardless of the student's balance.

If the GIVE CHANGE option is not chosen in the preferences, the default will be to ACCEPT ALL money from students as deposits to their accounts. The default can be overridden in the MAKE CHANGE window if necessary. You might need to experiment and then choose the preference that will work the best for you.
You can only make change for a student while his account is currently in the Transaction Box on the left of the LUNCH window. After you have entered the account number and all of the student’s transactions, such as extra milk or á la carte items, click the MAKE CHANGE button or scan the barcode from the barcode menu. This window will appear:
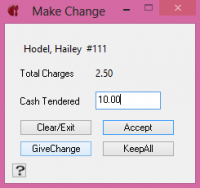
The total current charges —for that transaction only, not any previous ones— will appear in the MAKE CHANGE window. The cursor will be in the CASH TENDERED field. Enter the amount of money that the student gives you. Click the ACCEPT button or scan the appropriate barcode. The LUNCH window will then display a message with a summary of the transaction in red. Depending on your choice in PREFERENCES, you will get a message that either accepts the money as a deposit to that account or a message telling you how much change the student should receive.
Deposits made from the MAKE CHANGE window will not be posted to the student’s account until a deposit report is printed, exactly like a deposit made through the regular DEPOSIT window. You can override your default in the MAKE CHANGE window by clicking either the GIVE CHANGE button or the KEEP ALL button. If your default is set to give change, clicking the KEEP ALL button will override the default and keep the student’s money as a deposit. If the default is set not to give change, you can still give change by clicking the GIVE CHANGE button.
When using the MAKE CHANGE option, the student must give you an amount equal to or greater than the amount of the meal. The program doesn’t accept partial payments. As always, if you find yourself in the MAKE CHANGE window by mistake or the student changes his mind, just click the CLEAR/EXIT button and continue with the transaction. If you find that you made a mistake in the MAKE CHANGE window and the transaction is still in the LUNCH window, click the MAKE CHANGE button again and enter the correct information. The new entry will replace the previous one and you can continue with the transaction.
